-
Howto
Online buttons generator. Customize font, background color, border, border color, shadow and gradient for buttons.
You can create your own, original buttons for oscommerce sites. You can create non-standard buttons for oscommerce in a number of languages. Easy in use and useful generator of oscommerce buttons.
You can find them here and put them in the components/com_oscommerce_personal/templates/joomlastyle/buttons/english or other language
oscbuttons.com
oscommerce.buttonsworkshop.com
MarvikShop is a component for Joomla. The template is Joomla. MarvikShop just change their layout to your own Joomla template. Of course you can change a little in
components/com_oscommerce_personal/templates.
The Joomla template is module based. So you can place the MarvikShop modules anywhere you like on your website, even in the text articles
How do you put a MarvikShop module inside an article?
One of the frequent questions that we receive is "How can I include your modules within the content of Joomla 1.5?"
We have given individual customized answers to many users, but this article will make it very clear and accessible to everyone.
Let's take one example. This can be placed in any module position of the template by default, but not within content. This tutorial shall now explain how to enable it (or any other module) within content in Joomla! 1.5.
STEP 1: Create a new copy of the Module just for in-content use.

Extensions > Module Manager. Check the checkbox before the module in question and click on "Copy" on the top right (see image).
The copy is placed just under the original in the same module position and is unpublished by default. It will be named "Copy of ...".
STEP 2: Open the Module that you just copied.
 Now just click on the name of the module (Copy of ...).
STEP 3: Change the "Module Position"
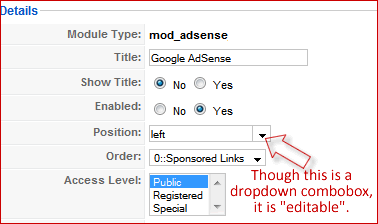
Here, we are going to do something very sleek. With the module opened, look at the left side of the screen. You will see a parameter named "Position". It will have a dropdown combobox in front of it. Joomla! developers have hidden a truly powerful option here. It is "editable". See picture on the right to get a clear idea. So what? Read on...
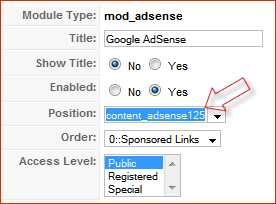
Let's edit the position name and "create" a new unique position just for in-content use, which will not be shown on the template elsewhere. Do not click on the arrow, but click directly within the textbox of that field and "delete" the content (using delete or backspace key). Now type a new name, let's say content_adsense125 (You can type any name you want, but this to me means that I am using this for showing AdSense ads, 125x125 size for in-content use).
Look at the next picture below for what it will look like. After making the other necessary changes to the module parameters on the right side, "Save" the module. This will now be saved in the "new" position that you just created.As it is a custom position, it will not show on the frontend. That was our purpose too, we want it to show only within content and only where we assign. See the right side ads for an example.

STEP 4: Go to the Plugin Manager
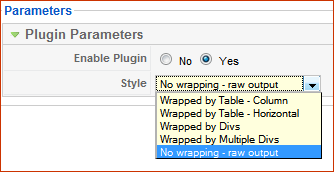
 Extensions > Plugin Manager. Look for a plugin named "Content - Load Module". Open it. On the right side, you will see a dropdown box. Click on its arrow and select "No wrapping - raw output" as shown in the next picture.
STEP 5. STEP 6, STEP 7...
Open your content item within which you want to show the module. In the desired location within the article, just type

where"loadposition" is a constant to call the plugin that we just edited in step 4 and "module" is the variable module position to be called, in this case we should change it to content_adsense125 as done in step 3. As indicated above, change only the blue text and leave the red untouched.
Just one word of caution, do not use standard positions like "left" or "user1" inside content. They may load ALL the modules in that position into that content.
From now on, you should be able to place any module in any content of your choice. Please let us know if you get into any trouble with these steps.

Move the downloads folder from main default location / rename it
change the location to the new value in the following file
components/com_oscommerce/includes/configure.php
Instead of maken some xml files for joomfish. Marvikshop got's his own translations.
1. All you need do is download the Marvikshop language pack of your choice,
2. The folder structure has changed, so you will need to copy the catalog language folder to components/com_marvikshop_lang/languages, the admin language to components/com_marvikshop_lang/languages/admin
3. Due to us many additional language definitions, we have added a tool to compare and update missing language files and definitions, this can be accessed by the marvikshop language admin menu link, please make sure the languages folder is chmodded 0777
In the first version of MarvikShop it was standard. Unfortunately people didn't know how to use this and we reverse the whole thing. If you want it back , you can use the following instructions.
Change DIR_EXT_HTTP to DIR_WS_CATALOG_IMAGES
administrator/components/com_oscommerce/categories.php
administrator/components/com_oscommerce/product_list.php
administrator/components/com_oscommerce/products_extra_images.php
administrator/components/com_oscommerce/products_multi.php
administrator/components/com_oscommerce/reviews
administrator/components/com_oscommerce/specials
administrator/components/com_oscommerce/invoice.php
administrator/components/com_oscommerce/auctions.php
administrator/components/com_oscommerce/packingslip.php
Change DIR_EXT_HTTP to DIR_WS_IMAGES
components/com_oscommerce/mshop_pl_src.php
components/com_oscommerce/product_info.php
components/com_oscommerce/product_list.php
components/com_oscommerce/shopping_cart.php
components/com_oscommerce/product_reviews_info.php
components/com_oscommerce/includes/modules/also_purchased_products.php
components/com_oscommerce/includes/modules/default_specials.php
-components/com_oscommerce/includes/modules/new_products.php
components/com_oscommerce/
components/com_oscommerce/components/com_oscommerce_personal/templates/joomlastyle/product_info.html
components/com_oscommerce_personal/templates/joomlastyle/account_history_info.htmlmodules/mod_marvikshop_reviews/mod_marvikshop_reviews.php
modules/mod_marvikshop_featured/mod_marvikshop_featured.php
modules/mod_marvikshop_featuredstat/mod_marvikshop_featuredstat.php
modules/mod_marvikshop_random_products/mod_marvikshop_random_products.php
modules/mod_marvikshop_specials/mod_marvikshop_specials.php


